Wedding dress and the magic day.
Hello
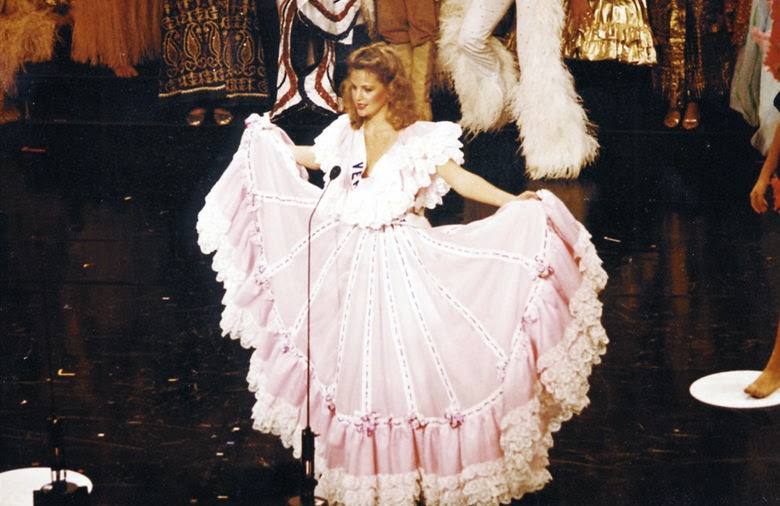
The journey started with the inspiration. Surfing through the internet, I found the perfect dress for me. The dress is not just pink, beautiful light pink but also the national dress of my country. The dress was used by one of our most famous misses in Miss Universe 1981. (Pic. 1)
I have been getting better in making muslin for myself, but when it comes to decide what fashion fabric to use for this dress, the task was not easy, so I looked for help through the internet and started to prepare myself, buying sewing couture books, and making sewing couture online courses.
I got help from professional sewers advising me what type of fabric I could use. I was thinking to use silk georgette but after so many thoughts and the advise of professional sewers I made my mind for Soft light pink Organdy. During the process I did have more and more questions than answers. I didn't want to use boning, and even without seeing quite well the bodice of the dress, I decided to sew a princess seam. What type of underlining to use? Well, I did want my bodice to feel comfortable but sturdy, so, cotton muslin or flannel will work for me, even when I also got advise to use cotton batiste. What type of lining? I will use Silk crepe de chine, because is soft but above everything is not so shining.
On the internet you can find different techniques on how to make roses, since the dress has flowers details, I did have to learn how to make flowers with sateen ribbon and make 24 of them.
My first princess seam, the fitting was great, but I didn't like the princess seam to go so high over my armhole.(Pic. 2)

 Pic. 2
So I did some changes here and there and this was the result. I like more, from my perspective it looks more proportional. But, its just all about taste.!! Pic 3

When I did my first Princess seam the zipper was in the middel (Pic. 4) of the back bodice, but for avoiding to cut my flounces in the middle, I changed the zipper to the side; in that way my flounces will be just one piece, Pic 5


 Married
The journey started with the inspiration. Surfing through the internet, I found the perfect dress for me. The dress is not just pink, beautiful light pink but also the national dress of my country. The dress was used by one of our most famous misses in Miss Universe 1981. (Pic. 1)
Pic. 1
I have been getting better in making muslin for myself, but when it comes to decide what fashion fabric to use for this dress, the task was not easy, so I looked for help through the internet and started to prepare myself, buying sewing couture books, and making sewing couture online courses.
I got help from professional sewers advising me what type of fabric I could use. I was thinking to use silk georgette but after so many thoughts and the advise of professional sewers I made my mind for Soft light pink Organdy. During the process I did have more and more questions than answers. I didn't want to use boning, and even without seeing quite well the bodice of the dress, I decided to sew a princess seam. What type of underlining to use? Well, I did want my bodice to feel comfortable but sturdy, so, cotton muslin or flannel will work for me, even when I also got advise to use cotton batiste. What type of lining? I will use Silk crepe de chine, because is soft but above everything is not so shining.
On the internet you can find different techniques on how to make roses, since the dress has flowers details, I did have to learn how to make flowers with sateen ribbon and make 24 of them.
My first princess seam, the fitting was great, but I didn't like the princess seam to go so high over my armhole.(Pic. 2)

So I did some changes here and there and this was the result. I like more, from my perspective it looks more proportional. But, its just all about taste.!! Pic 3

Pic 3
Thanks to Couture: Fine Art of Sewing Carr, Roberta I learned all the calculations for making the flounces for the bodice neck and also the skirt, specially when the skirt needed to be not just full skirt but with a lot of extra fabric for being able to open it high enough. Also for the ruffles details in the bottom part of the skirt, this book was a good reference. When I did my first Princess seam the zipper was in the middel (Pic. 4) of the back bodice, but for avoiding to cut my flounces in the middle, I changed the zipper to the side; in that way my flounces will be just one piece, Pic 5
Pic 4

Pic 6. Lapped zipper to the side.
The skirt was made of 4 big pieces allowing me not just to have a full skirt but a little more than that, Pic 6

Pic 6
I bought meters and meters of eyelet ribbon, pink sateen ribbon, and alot of lace trimming for the flounces and gathered hem. Every part of the skirt was sew together With French seam, not just the fashion fabric but also the lining.
I finished my dress the same week I was getting married. Pictures of the Whole process I dont have but please just asked me if you have any question. (^.^)

Lining

Bra carrier

Zipper

Front flower

Skirt lining - French seam and serger

Sateen ribbon flowers

Ready for being iron

Wedding Day


Congrats on the wedding! You did an awesome job on the dress!
ReplyDeleteThanks so much Zina.! Thanks so much for Your comment.
Delete